6. DOM
window에 로드된 문서를 제어하기 위한 object model
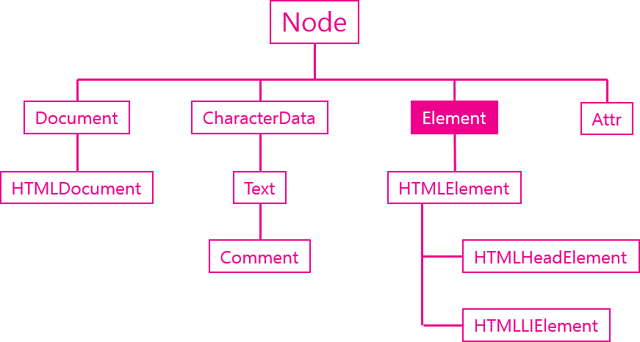
6.7 Element 객체
- HTMLElement: HTML에서 사용되는 태그를 포함하는 객체.
- HTMLElement를 포함하는 Element 객체가 존재한다. 문서상의 모든 element에 대한 특성을 정의.
- HTMLElement와 Element 객체를 구분한 이유
- DOM은 HTML만을 대상으로 하지는 않기 때문이다.
- 모든 markup element를 대상으로 한다. (e.g., XML, SVG 등)
Chrome 개발자 도구의 property를 이용해서 선택한 element가 소속된 모든 부모객체를 볼 수 있다.
다른 객체들과의 관계
주요기능
Element 객체의 주요 API
- 식별자: 문서 내의 element를 식별하는 용도.
- 조회: element의 하위 element들 (e.g., 문서 내의 HTML Element)를 조회.
- 속성: element의 속성을 알아보고 변경.
식별자 API
식별자: 작업하고자 하는 element를 찾을 수 있도록 갖는 이름 같은 것
다음 li element에 대해서:
<li id="active" class="important current">JavaScript</li>Element.tagName
- element의 태그 이름을 알아낸다 변경은 불가하다.
document.getElementByid('active').tagName // =>LI
Element.id
- Element의 id값을 읽고 변경한다.
var active = document.getElementById('active');
// active의 id를 deactive로 변경
active.id = 'deactive';
Element.className
- element의 class값을 읽고 변경한다.
- 주로 다음의 classList를 대신 사용한다.
var active = document.getElementById('active');
// class 값을 important와 current로 변경
active.className = "important current";
// readed 클래스를 추가
// active.className + " readed";와 같은 것
active.className += " readed"
className은 class의 존재 여부를 매번 확인해야하고 추가, 삭제가 용이하지 않다
Element.classList
active.classList // => DOMTokenList- element객체의 classList가 반환하는 값은
DOMTokenList이다. - 유사 배열로 index notation이나 여러 method를 사용할 수 있다.
method 설명 example addclass 값을 추가 active.classList.add('important')removeclass 값을 제거 active.classList.remove('important')toggle해당 class가 없으면 추가 있으면 제거 `active.classList.toggle('important')
조회 API
특정 element를 조회하고 조회 대상을 제어한다.
- 이전까지 사용한
document.getElementsBy *method는 문서 전체를 대상으로 했다. - Element 객체에도
getElements *method가 존재하며 해당 element에 한정해 하위 element를 조회한다.
<ul>
    <li class="marked">html</li>
    <li>css</li>
    <li id="active">JavaScript
        <ul>
            <li>JavaScript Core</li>
            <li class="marked">DOM</li>
            <li class="marked">BOM</li>
        </ul>
    </li>
</ul>
// 문서 전체에서 marked를 class값으로 갖는 element를 조회
var list = document.getElementsByClassName('marked');
for(var i = 0; i < list.length; i++){
console.log(list[i].textContent);
}
// Id 값으로 active를 갖는 element 아래있는 element중
// marked를 class값으로 갖는 element를 조회
var active = document.getElementById('active');
var list = active.getElementsByClassName('marked');
for(var i = 0; i < list.length; i++){
console.log(list[i].textContent);
}
속성 API
HTML에서 태그 이름만으로는 부족한 정보를 보충해주는 속성과 그 값을 제어한다.
<a id="target" href="http://opentutorials.org">opentutorials</a>var t = document.getElementById('target');Element.getAttribute
- 해당 속성의 값을 가져온다.
t.getAttribute('href'); // => http://opentutorials.org
Element.setAttribute
- 해당 속성의 값을 바꾼다.
- 해당 속성이 존재하지 않을경우 속성과 그 값을 추가한다.
// title 속성과 그 값 opentutorials.org를 t에 추가
t.setAttribute('title', 'opentutorials.org');
Element.removeAttribute
- 해당 속성을 제거한다.
// title 속성 삭제
t.removeAttribute('title');
Element.hasAttribute
- 해당 속성을 갖는지 확인한다.
- 가지면
true, 아니면false를 반환한다.t.hasAttribute('title'); // => false
속성(attribute)과 프로퍼티(property)
class값을 attribute방식과 property방식을 각각 이용해서 바꿀 수 있다.
var target = document.getElementById('target');
// attribute 방식
target.setAttribute('class', 'important');
// property 방식
target.className = 'important';- property 방식이 보다 간편하고 속도도 빠르지만 속성의 이름과 그것을 제어하는 property의 이름이 조금씩 다르기 때문에 주의해야한다.
- 또한, 동일한 속성의 값을 얻더라도 두 방식으로 얻은 값이 다를 수도 있다.
<!-- 현재 웹페이지: http://localhost/webjs/Element/attribute_api/demo3.html -->
<a id="target" href="./demo1.html">ot</a>
var target = document.getElementById('target');
console.log('target.href', target.href); // => http://localhost/webjs/Element/attribute_api/demo1.html
console.log('target.getAttribute("href")', target.getAttribute("href")); // => ./demo1.html
jQuery 속성 제어 API
- jQuery에서 속성(attribute)을 읽고 그 값을 변경하는 method는
attr이다. - 속성을 제거하는 method는
removeAttr이다.
var t = $('#target');

t.attr('href'); //http://opentutorials.org
t.attr('title', 'opentutorials.org'); // title 속성의 값을 추가
t.removeAttr('title'); // title 속성을 제거
jQuery도 attribute방식과 property 방식을 구분한다.
attr: attribute 방식의 class 제어prop: property 방식의 class 제어
<a id="t1" href="./demo.html">opentutorials</a>
<input id="t2" type="checkbox" checked="checked">
// 현재 문서의 URL: http://localhost/jQuery_attribute_api/demo2.html
var t1 = $('#t1')
;
t1.attr('href'); // => ./demo.html
t1.prop('href'); // => http://localhost/jQuery_attribute_api/demo.html
var t2 = $('#t2');
t2.attr('checked'); // => checked
t2.prop('checked'); // => true- Element 객체의 method와 다르게, jQuery를 이용하면 property나 attribute의 method를 혼동해서 입력해도 올바르게 고쳐서 수행된다.
jQuery 조회 범위 제한
특정 element 안에서만 원하는 element를 조회하고 싶을 때.
Selector Context 이용
$(".marked", "#active").css("background-color", "red");- id를
active로 갖는 element의 하위 element 중 class가marked인 element의 배경색을 빨강으로 변경 $"#active .marked"와 동일하다.
'.find()' 이용
$("#active").find(".marked").css("background-color", "red");- argument로 전달한 선택자에 해당하는 element만 선택.
- 조건을 만족하는 element를 담은 jQuery object를 반환한다.
- 위와 동일한 기능을 하는 예시.
- 주로 체인을 끊지 않고 작업 대상을 변경하고 싶을 때 이용한다.
- e.g,
$("#active").css("color", "blue")."find(".marked").css("background-color", "red"); - id가 active인 element의 색상을 파란색으로 바꾼 뒤,
- 그 중 class가 marked인 개체를 찾아서 배경색을 빨강으로 변경
- e.g,
'공부를 합니다 > 언어 (Language)' 카테고리의 다른 글
| 웹브라우저 자바스크립트_6 DOM-4 (Node 객체) (0) | 2020.07.28 |
|---|---|
| JavaScript: The Definitive Guide_3 Types, Values, and Variables (0) | 2020.07.24 |
| 웹브라우저 자바스크립트_6 DOM-2 (HTML Elements, HTMLCollection, jQuery 객체) (0) | 2020.06.29 |
| 웹브라우저 자바스크립트_6 DOM-1 (제어대상을 찾기, jQuery) (0) | 2020.06.11 |
| JavaScript: The Definitive Guide_2 Lexical Structures (0) | 2020.06.02 |
